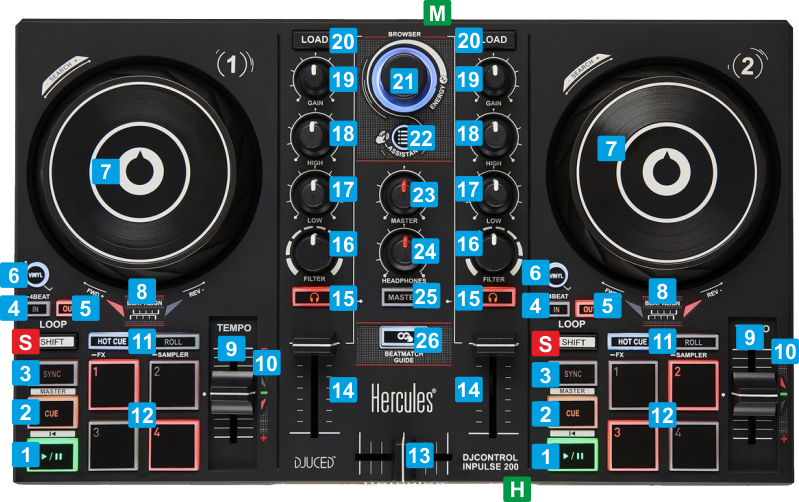
M MASTER OUTPUTConnect a pair of amplified speakers using standard RCA cablesH HEADPHONES SOCKETConnect your Headphones using a 1/4 " cable or adapterS SHIFTPress this button down to access secondary actions as described in the SHIFT ACTION column
KEY
ACTION
SHIFT (SECONDARY) ACTION
1 PLAYPlay/Pause the track loaded to left/right deckPlay-stutter track. When pressed, track will resume playing from the previously stopped position2 CUESets current position as Temporary Cue point. Preview track when paused while button is pressed Jumps and stops to the Cue point when playing[Returns to the beginning of the track3 SYNCMatch BPM and Beat Phase with the opposite deckSmooth pitch reset. When pressed track will gradually get its original tempo4 LOOP INWhen not in loop, press to set current position as the beginning of a manual loop. Press and hold this button for more than 1 second to turn a 4 beats auto-loop on/offHalf the size of the loop5 LOOP OUTWhen not in loop, press to set current position as the end of a manual loop. When in loop, press to exit the loopDouble the size of the loop6 VINYLEnable/disable Vinyl mode. When enabled, use the upper/top surface of the jogwheel to scratch and the outer to bend. When disabled, the entire surface (upper and outer) of the jogwheel will be used for bending.7 JOGWHEELTouch-sensitive jogwheel for scratching or bending (temporary speed up/down tempo) the track, depending on the Vinyl mode.Fast seek (search) track forward/backwards8 BEAT ALIGNThese leds indicate the direction the jogwheel needs to be moved to, in order its beat-grid to match with the opposite deck. Leds will operate if: - the BeatMatch Guide button [26] is turned on - the Deck is not the Master-Deck (deck that is playing out live - on air) - the deck is not playing9 TEMPOAdjust the tempo of the loaded track When in middle position (green led is turned on), the track plays at its original speed..10 TEMPO ASSISTANT LEDsWhen turned on, the LED will indicate the direction the Tempo fader needs to be moved in order the track to get the same BPM as the opposite one. When a LED flashes, indicates the direction the Tempo fader needs to be moved in order the actual/hardware fader to catch the software tempo value and re-gain tempo control from the Inpulse. This can happen if the SYNC button is pressed and the track gets a tempo value different than the one the hardware fader designates. Both LEDs will operate only when the BeatMatch Guide button [26] is enabled. .11 PAD MODESSet the 4 Pads to Hotcue, Roll, FX (long press of Hotcue button) or Sampler (long press of Roll button) mode. See Pads page for further details.12 PADSThese buttons offer different functionality depending on the selected Pads mode See Pads page for further details.These buttons offer different functionality depending on the selected Pads mode See Pads page for further details13 CROSSFADERWhen on far left position, only sound from the left deck will be heard from the Master Output. When at far right position, only the sound of the right deck will be heard from the Master Output. In all other positions, the audio signals from left/right decks will be blend. 14 VOLUMEAdjust the Volume of the Left/Right deck15 PFLUse these buttons to send the pre-fader audio signal of the Left/Right deck to the Headphones channel for pre-listening (connection at the front side).16 FILTERUse these knobs to apply a High/Low Pass Filter to the Left/Right deck. No Filter is applied (off) when the knob is at the center/middle position17 LOWUse these knobs to cut/boost the frequencies of the Low/Bass Equalizer Band No adjustment is made when the knob is at the middle/center position18 HIGHUse these knobs to cut/boost the frequencies of the High/Treble Equalizer Band No adjustment is made when the knob is at the middle/center position19 GAINUse these knobs to adjust the pre-fader output level of the Left/Right deck When the knob is at the middle/center position, the track will be at zero dB level (or any other value set in VirtualDJ Options)20 LOADUse these buttons to load the selected track from the Browser to the Left/Right deck. Double/fast-press these buttons to clone the track from the opposite deck to the Left/Right deck.Unload the deck 21 BROWSERUse this dial to scroll through the folders or tracks, depending on the focused Browser List. Push the dial, to toggle focus between the Folders and Songs Lists. When focus is on the Folders List, push and hold dial down (for about 1 second) to open/close sub-folders. The RGB led of this dial indicates the currently playing out deck (on air), blue for Left deck and red for Right deck Push to toggle between Normal and Zoom Browser view (applies to default VirtualDJ GUIs and other custom ones that support Browser zoom 22 ASSISTANTUse this button to select the Recommendations folder and get online suggestions based on the currently playing track. Press again to select the previously working folder.23 MASTER VOLUse this knob to adjust the level of the Master Output (connection at the rear panel).24 HEADPHONES VOLUse this knob to adjust the level of the Headphones Output (connection at the front panel).25 MASTER PFLUse this button to send the audio signal from the Master Output to the Headphones channel. Hardware operation, not visible in GUI or controlled from VirtualDJ26 BEATMATCH GUIDEUse this button to enable/disable Beat-Match Guide. When enabled, the Beat-Align [8] and Tempo assistant [10] leds will offer their described functionality Pads