Hercules - Inpulse 200
PADS
KEY
ACTION
LONG PRESS ACTION
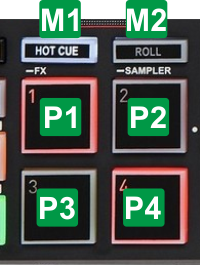
M1 HOTCUEPress this button to assign the 4 Pads to Hotcues mode (led will be turned on solid)Long press (for more than 2 seconds) to set the 4 Pads to FX mode (led will be flashing)M2 ROLLPress this button to assign the 4 Pads to Loop Roll mode (led will be turned on solid)Long press (for more than 2 seconds) to set the 4 Pads to Sampler mode (led will be flashing)HOTCUE MODE
Press the HOTCUE mode button [M1] to set the Pads to Hotcue mode. The Hotcue Pads page will be also displayed on the GUI of VirtualDJ, reflecting the operation of the 4 top Pads. 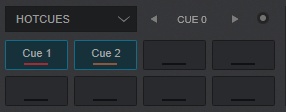
Hotcues Pads Page KEY
ACTION
SHIFT (SECONDARY) ACTION
PADS 1-4Assigns current track's position to Hotcue 1 to 4 or jumps to its position if already setDelete the assigned Hotcue 1 to 4
ROLL MODE
Press the ROLL mode button [M2] to set the Pads to Roll mode. The Roll 4* Pads page will be also displayed on the GUI of VirtualDJ, reflecting the operation of the 4 top Pads.
*Note: This special Pads Page will be available to select, only if the Inpulse 200 is connected. 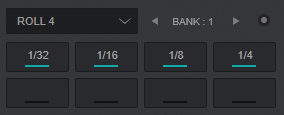
Roll 4 Pads Page KEY
ACTION
SHIFT (SECONDARY) ACTION
PADS 1-4Press and hold a Pad to trigger a Loop Roll of a size in beats, depending on the selected Bank. The track will resume playing from the position it would have been if the loop was never triggered. The Bank can be selected (and memorized) from the GUI with the Param 1 arrow buttonSame action
FX MODE
Press and hold (for about 2 seconds) the HOTCUE mode button [M1] to set the Pads to FX mode (led will be flashing). The
Inpulse200 FX* Pads page will be also displayed on the GUI of VirtualDJ, reflecting the operation of the 4 top Pads.
The functionality of the Pads in this mode depends on the selected
Software or
Hardware FX mode.
Open VirtualDJ Settings, OPTIONS tab and select the Controller category.
Find the
HCINP200-FXmodee setting at the top and select between the 2 modes.
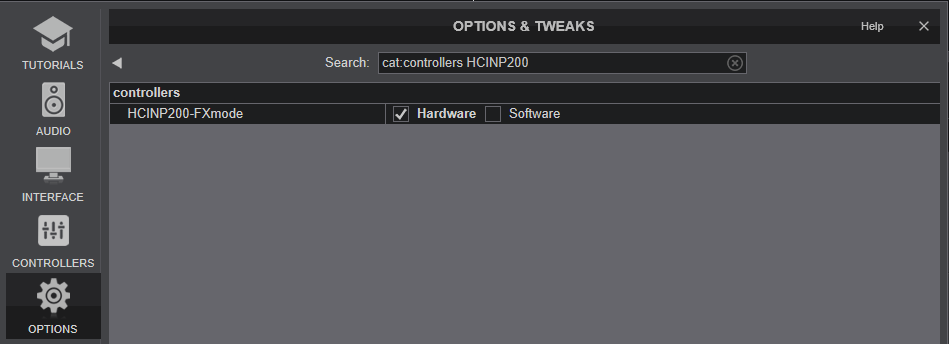 In Hardware mode (default) the functionality is mostly hard-coded in the Inpulse firmware and most of it cannot be changed. As a result of this hardware functionality, the Pads on the GUI do not offer any functionality if triggered from GUI, they just offer an aid showing the selected FX mode and an idea of what each Hardware pad does.
*Note: This special Pads Page will be available to select, only if the Inpulse 200 is connected. 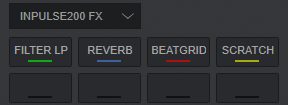
Inpulse200 FX Pads Page - Hardware mode In Software mode (default) the 4 Pads trigger VirtualDJ software Effects and can be changed from the Pads Editor.
*Note: This special Pads Page will be available to select, only if the Inpulse 200 is connected. 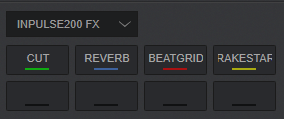
Inpulse200 FX Pads Page - Software mode KEY
HARDWARE MODE
SOFTWARE MODE
PAD 1Press and hold Pad 1 to trigger the Filter LP Effect. The pad also controls the 1st Parameter of the LP Filter effect, starting from the zero value and gradually increasing to the maximum, as long as the pad is pressed. Effect is turned on when the pad is released (momentary) Applies the Cut VDJ Effect **. PAD 2Press Pad 2 to trigger the Reverb * Effect. The pad also assign the 1st Parameter of the Reverb effect to a certain value, and gradually fast-decreases deck's Volume to the minimum. Effect is turned on when the pad is pressed again (toggle)Applies the Reverb VDJ Effect **. PAD 3Press and hold Pad 3 to trigger the Beat Grid Effect. The Effect is turned off when the pad is released (momentary)Applies the BeatGrid VDJ Effect **. PAD 4Press and hold Pad 4 to perform a "Baby" Scratch effect at the current position. The Scratch is turned off when the pad is released (momentary)Applies the BrrakeStart VDJ Effect **. Note *:
For best results on the Reverb Effect, it is advised to enable the Post Fader Effects setting (from VirtualDJ Settings->Options tab->fxProcessing setting to Post-fader). This will allow to some Effects, such as the Reverb one, to continue trailing for a while, when the Volume fader is moved to the minimum positionNote **:
Parameters can be adjusted from the GUI
SAMPLER MODE
Press and hold (for about 2 seconds) the ROLL mode button [M2] to set the Pads to Sampler mode. The Sampler Pads page will be also displayed on the GUI of VirtualDJ, reflecting the operation of the 4 top Pads. 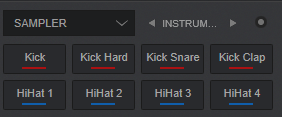
Sampler Pads Page KEY
ACTION
SHIFT (SECONDARY) ACTION
PADS 1-4Press Pad 1 to 4 to trigger a Sample (1 to 4) of the selected Sampler Bank (1st Parameter of Sampler Pads page) The sample will be triggered depending on the selected Trigger Sampler mode (2nd Parameter of the Sampler Pads page) Stop the playing sample. Useful when the Stutter or Un-mute trigger mode is selected*Note: If the selected Sampler Bank has less than 5 samples, both sides of the Pads will trigger the same samples. If the selected Sampler Bank has more than 4 samples, the left side Pads will trigger Samples 1 to 4 and the right side Pads will trigger Samples 5 to 8.
For further Technical features and specifications, visit Hercules DJ CONTROL INPULSE 200
Product's Page
 Hardware Integration Department 2018 - ATOMIX PRODUCTIONS Reproduction of this manual in full or in part without written permission from Atomix Productions is prohibited.


