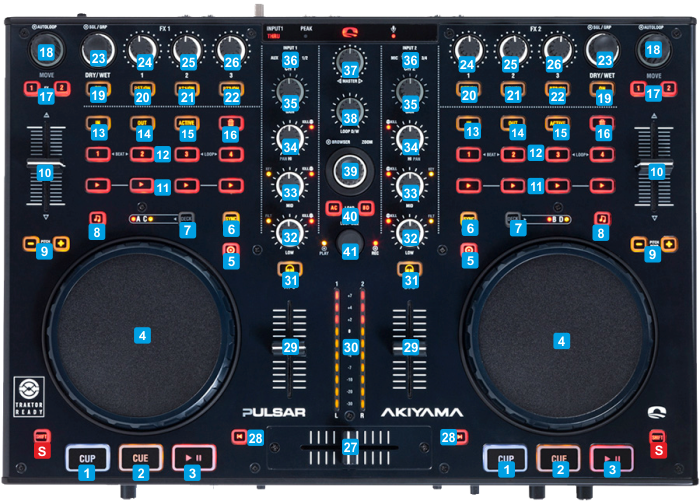
S SHIFTPress this button down to access secondary actions as described in the SHIFT ACTION column1 CUP When track is playing, goes to the last Cue point and play from there when button is released. When track is paused, sets a temporary Cue point Tap on track's tempo (fat least 4 times) to manually calculate tempo2 CUE Set temporary Cue point or return to Cue and preview while pressedJump to the beginning of the track 3 PLAYPlay/Pause track If playing, pauses track. If paused, play the track and sync tempo and phase with the opposite deck4 JOGTouch-sensitive platter for scratch or bend, depending on the Vinyl modeFast search (seek) through track's time 5 SCRATCHSets Jog to Scratch (Vinyl) mode when enabled or CD (Bend) mode when disabled Plays track in reverse while pressed. When released, track will continue playing from the position it would have been if the button was never pressed (censor)6 SYNCSync Tempo and Phase with opposite or Master DeckSet deck as Master Deck 7 DECK A/C-B/DAssign left/right side of controller to Decks 1/2 or 3/4 respectively8 KEYLOCKWhen enabled, locks the Key of the track so that it doesnt change when the pitch/tempo changed9 PITCHBEND -/+Temporary slow-down/speed-up track's tempo while button(s) is pressed. When released, tempo will return to the value designated by the Pitch fader.Select previous/next available -/+ % range for the Pitch fader10 PITCHAdjust track's tempo11 SAMPLER 1-4Trigger Samples 1 to 4 from the selected Sampler Bank. If the Bank has less then 5 samples, both sides trigger samples 1 to 4. If the Bank has more than 4 samples, left side triggers Samples 1 to 4 and right side triggers Samples 5 to 8.Stop the playing Sample 1-4 (or 1 to 8)12 HOTCUES 1-4Assign a Hotcue 1 to 4 or jump to that Hotcue if assigned. Delete the assigned Hotcue when the Delete mode is enabledHotcue 1,2 : Move track backwards/forward in time by 4 beats. Hotcue 3 : Enable/disable Smart Cue Hotcue 4 : Enable/disable Smart Loop13 LOOP INSet current track's position as Loop In (Start) point of a manual loopSets jog to Loop In Adjust mode. When enabled, the jog fine adjusts the Loop In point of a manual loop 14 LOOP OUTSet current track's position as Loop Out (End) point of a manual loop. Exits loop if a loop is enabled.Sets jog to Loop Out Adjust mode. When enabled, the jog fine adjusts the Loop Out point of a manual loop 15 LOOP ACTIVETriggers an Auto-Loop of the selected size in beats. Exits loop when loop is enabledSets jog to Loop Move Adjust mode. When enabled, the jog fine moves backwards/forward the triggered Loop through time 16 DELETEWhen enabled, sets Hotcue 1-4 buttons to Delete mode.17 FX1/FX2FX1 : Sets FX buttons and knobs to Effect mode (default mode) FX2 : Sets FX buttons and knobs to Sampler mode18 AUTO LOOP ENCHalves/doubles the size of the Loop. Push to enable/disable an Auto-Loop of the selected size in beatsWhen Loop is enabled, moves the loop backwards/forward in beats equal to the size of the loop Push to enable/disable Loop Back mode19 FX ONIn Effect mode : Selects and triggers the Echo Effect. In Sampler mode : Records deck to a new sample20 FX RSTONIn Effect mode : Selects and triggers the Flanger Effect. In Sampler mode : If the selected Sample is in Loop mode, halves the size of the Sampler Loop21 FX BUT1In Effect mode : Selects and triggers the BrakeStart Effect. In Sampler mode : If the selected Sample is in Loop mode, doubles the size of the Sampler Loop22 FX BUT2In Effect mode : Selects and triggers the Backspin Effect. In Sampler mode : Sets the selected Sample to Loop (repeat) mode23 FX DRY/WETIn Effect mode : Selects the previous/next available Effect. Push to trigger the selected Effect
In Sampler mode : Selects the previous/next Sample from the selected Sampler Bank Push to trigger the selected SampleIn Effect mode : Selects the previous/next available Effect Push to open/close the FX GUI of the selected Effect.
In Sampler mode : Selects the previous/next available Sampler Bank. Push to select the next available Sampler Trigger mode for the selected Sampler Bank 24 FX PARAM1Adjusts the 1st Parameter of the selected EffectAdjusts the 3rd Parameter of the selected Effect 25 FX PARAM2Adjusts the 2nd Parameter of the selected EffectAdjusts the 4th Parameter of the selected Effect 26 FX PARAM3Adjusts the Volume of the selected Sampler27 CROSSFADERBlends audio signals between the decks assigned as left and right sides of the crossfader28 XFADER/LINKLeft button : Toggles the mode for the Crossfader. (Audio or Video) to allow the Crossfader to control the Audio or the Video Crossfader Right button : Enable/disable Video Crossfader Link. When enabled, the Video Crossfader will be linked to the Audio Crossfader and will follow its positionTriggers the selected Video Transition to the Left/Right side 29 VOLUMEAdjust the Volume of the Left/Right assigned Deck (1/3 & 2/4)30 VU METERIndicate the pre-fader Output Level of the Left/Right assigned Decks31 PFLSend the Left/Right assigned Decks to the Headphones channel (for pre-listening)Selects the previous/next Mixer Center panel of the default VirtualDJ GUI 32 EQ LOWAdjust the Low (Bass) Equalizer Band. Push to kill (cut) the frequencies of the Low Equalizer BandApply a High/Low-Pass Filter to the Left/Right assigned Deck. Push to reset (turn off) Filter 33 EQ MIDAdjust the Middle Equalizer Band. Push to kill (cut) the frequencies of the Middle Equalizer BandAdjust the key of the Left/Right assigned Deck. Push to reset track's Key to the original value34 EQ HIGHAdjust the High (Treble) Equalizer Band. Push to kill (cut) the frequencies of the High Equalizer Band35 GAINAdjust the pre-fader Output Level of the Left/Right assigned Deck36 CH INPUT SELRoute audio signal from a source to the Left/Right Mixer Channel. Set to middle position to route the USB Input to a Mixer Channel and control a VirtualDJ Deck. Set to AUX/MIC or IN 1/2 -3/4 to route an external source connected to the rear panel to a Mixer Channel.37 MASTER VOLAdjust the Volume level of the Master Output38 BOOTH VOLAdjust the 1st Parameter of the selected Video TransitionAdjust the 1st Parameter of the selected Master Video Effect 39 BROWSEScrolls through files or folders If focus is on the Songs List, push to add the selected track to the Automix List. If focus is on the Sideview, push to load the selected track to the default Deck. If focus is on the Folders List, push to open the next available sub-folder if the current folder has no tracks, or set focus to the Songs List if the current folder has tracks.Scrolls through foders. If focus is on Folders List, push to open/close sub-folders. If focus is on the Songs List, push to add the selected track to the Sidelist. If focus is on the Sideview, push to cycle through the available views of the Sideview 40 LOADLoad the selected track to the Left/Right assigned DeckSet focus to the previous/next Browser window41 TX/VFX ENCSelects the previous/next available Video Transition Adjust the 1st Parameter of the selected Video Transition, while the Transition is active. Push to trigger the selected Video TransitionSelects the previous/next available Video Effect on Master. Adjust the 1st Parameter of the selected Master Video Effect while the Video Effect is active. Push to trigger the selected Video Effect on MasterFront & Rear Panels