


XDJ-RX2
MIXER & EFFECT CONTROLS
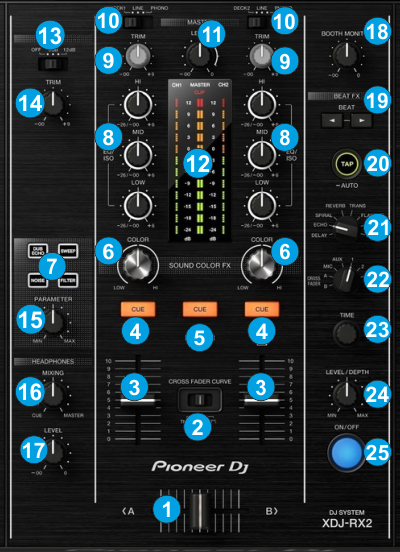
MIXER CONTROLS
- CROSSFADER: Blends audio between the left and right mixer channels.
- CROSS FADER CURVE: Select a slope for the Crossfader. When in THRU position, the Crossfader will have no affect on the Audio signals from the left and right channels. When in middle position, the blend will be smooth when moving the crossfader from one edge to the other. When in right position the blend will be instant near the edges (for Scratch)
- VOLUME: Alter the output Volume of Left/Right Mixer Channel.
- CUE (CH PFL). Press this button to send Left/Right channel's pre-fader signal to the Headphones Channel for monitoring. When engaged, the button will be lit.
- CUE (MASTER). Press this button to send the Master Output signal to the Headphones Channel for monitoring. When engaged, the button will be lit.
- COLOR FX PARAM. Use this knob to apply the selected Color FX. When in middle position, the selected Color FX is not applied, even if it is enabled from the selection buttons
- COLOR FX SELECT. Use buttons to select one of the 4 available Color FX (Echo, Sweep, Noise, Filter). Note that the Color FX will sound different, depending on the selected Mixer Mode.In MIDI Mixer Mode, the Color FX can be changed via VDJ Script actions.
- 3-BAND EQ . Use these 3 knobs to adjust the 3 Bands of the Equalizer. Adjust the Low (Bass)/Mid (Middle)/High (Treble) frequencies of Left/Right mixer channel.
- TRIM: Adjusts the pre-fader output level (gain) of Left/Right channel mixer.
- SOURCE : Select the source for the Left/Right Mixer Channel. Select the USB position to control a VirtualDJ Deck or a track loaded from a USB Drive. Select LINE or PHONO to assign Left/right Mixer Channel to the External audio source (connections at the rear panel)
- MASTER VOLUME : Adjusts the level of the Master Output (Connection at the rear panel). Hardware Control - Movement visible on VirtualDJ GUI
- VU-METER: The 2 middle series of leds Indicate the level of the Master Output. The left and right series of leds indicate the pre-fader signal of the selected Source for the Left/Right mixer channels.
- AUX : Use this switcher to turn on/off the signal from the Auxiliary Input (connection at the rear panel). When in OFF position, the signal of this input is not heard. Choose the other 2 positions to route the signal of the auxiliary input directly to the Master Output.
- AUX TRIM : Use this knob to adjust the output level of the auxiliary input. When the AUX switcher is at OFF position, the knob controls the Master Volume of the VirtualDJ Sampler
- COLOR PARAMETER 2 : When the Pioneer XDJ-RX2 is set to Hardware Mixer mode, use this knob to adjust the 2nd Parameter of the selected Color FX. When the unit is set to MIDI Mixer mode, this button has no functionality, and can be assigned to a VirtualDJ action. See further details about the Mixer modes in the Advanced Setup
- PHONES MIXING: Turn to mix between Cue and Program in the Headphone channel. When all the way to the left, only channels routed to the Headphones channel (via the CUE buttons) will be heard. When all the way to the right, only the Program mix will be heard. Hardware Control - Movement visible on VirtualDJ GUI
- PHONES LEVEL: Adjusts the level of the Headphones Output (Connection at the front panel). Hardware Control - Movement visible on VirtualDJ GUI
- BOOTH VOLUME : Adjusts the level of the Booth Output (Connection at the rear panel). Hardware Control - movement not visible on VirtualDJ GUI
Notes: None of the above mixer elements will move the relative VirtualDJ mixer element on the GUI when the Hardware Mixer mode is selected. When the MIDI Mixer mode is selected, Crossfader, Volume faders, EQ and TRIM knobs will control the internal mixer of VirtualDJ and their movements will be shown on the GUI.
See further details about the Mixer modes in the Advanced Setup
EFFECT CONTROLS
The BEAT FX section is used to apply Hardware or VirtualDJ effects to Decks/Master/Mic/AUX-Sampler, depending on the selected Mixer mode. Hardware Effects will be applied when the Hardware mixer mode is selected and VirtualDJ (software) effects will be applied when the MIDI mixer mode is selected.
- BEAT: Use these buttons to half/double the Beats Parameter of the selected Effect (for the Effects that are beat-aware). The beats value is displayed on the LCD.
- TAP: Use this button (tap on beat) to manually adjust the tempo that will be used for the selected Beat FX. This button has no functionality in MIDI Mixer mode. Hold this button for 2 seconds to automatically calculate the Tempo based on the internal Beat FX engine.
- BEAT FX SELECT: Use this selector knob to select one of the available Beat FX. Note that some Effects may sound different depending on the Mixer mode (MIDI or Hardware). The name of the selected Effect is displayed on the LCD.
- BEAT FX ASSIGN: Use this selector knob to select to which source the effect will apply to. (Decks, Master, Mic, Sampler/AUX). The selected source will be displayed on the LCD.
- BEAT FX TIME: When the unit is set to Hardware Mixer mode, use this dial to fine adjust the time interval between 2 beats for the selected Hardware effect. When the unit is set to MIDI mixer mode, the dial adjusts the 2nd Parameter of the selected VirtualDJ effect.
- BEAT FX LEVEL: Use this knob to adjust the 1st Parameter of the selected Effect. In Hardware mixer mode, the 1st Parameter is always the Level or Depth of the selected Beat FX. In MIDI mixer mode, this knob always adjusts the 1st Parameter of the selected VirtualDJ effect (usually the Strength , but could be different)
- BEAT FX ON: Use button to enable/disable the selected Beat FX. Its led will flash when enabled
Deck Controls