


Universal DJ
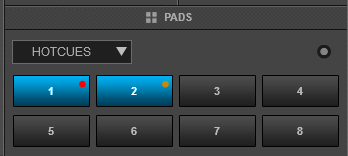
Pads
HotCues
Press the CUE mode button to set the 8 numbered Pads in HotCue mode (selection per side/deck). The HOTCUE Pads page will be also selected on the VirtualDJ GUI.
The CUE mode is the default selected mode when VirtualDJ is launched with the Hercules Universal connected.
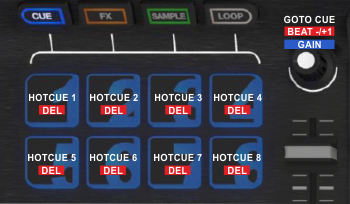
Each one of the 8 Pads assigns a Hot Cue Point or jumps to that Hot Cue Point.
When a Hot Cue Button is unlit, you can assign a Hot Cue Point by pressing it at the desired point in your track.
Hold SHIFT down and then press a Pad to delete its assigned Hot Cue Point.
Use the PARAMETER encoder to jump to the next/previous available Hotcue
Hold SHIFT down and then use the encoder to move the track forward/backwards by 1 beat.
Hold the CUE button down and then use the encoder to adjust the Gain of the track.
Effects
Press the FX mode button to set the 8 numbered Pads to Effects mode (selection per side/deck). A special UNIV FX Pads page will be also selected on the VirtualDJ GUI. This special Pads page will be available only when the Hercules Universal is connected.
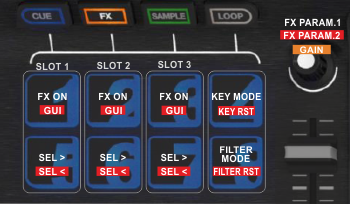
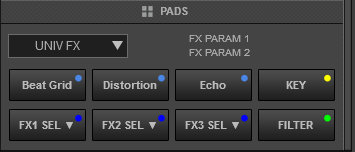
Each one of the 3 top Pads triggers the selected effect of Slot 1 to 3. The selected effects from all 3 slots can be triggered at the same time (chain effect).
Hold SHIFT down and then use the 3 top Pads to show/hide the GUI of the selected Effect in the right side of the Browser, and get all the available info and parameters of the Effect.
Use the 3 bottom Pads to select the next effect for Slots 1 to 3 respectively. Hold SHIFT down and then use the same Pads to select the previous effect for Slots 1 to 3.
Use the PARAMETER encoder to adjust the 1st Parameter of the selected effect for all 3 slots simultaneously.
Hold SHIFT down and then use the same encoder to adjust the 2nd Parameter of the selected effect for all 3 slots simultaneously.
Hold the FX mode button down and then use the encoder to adjust the Gain of the track
Use the 4th Pad at the top to enable/disable the Key mode. When the Key mode is enabled, the PARAMETER encoder will adjust the Key of the track.
Hold SHIFT down and then use the same Pad to reset the Key of the track to its original value.
Use the 8th Pad at the bottom to enable/disable the Filter mode. When the Filter mode is enabled, the PARAMETER encoder will apply a Low/High Pass Filter to the track.
Hold SHIFT down and then use the same Pad to reset the Filter.
Sampler
Press the SAMPLE mode button to set the 8 numbered Pads in Sampler mode (selection per side/deck).
The SAMPLER Pads page will be also selected on the VirtualDJ GUI.
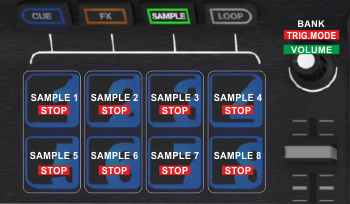
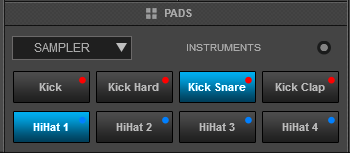
Each one of the 8 numbered Pads triggers a sample from the selected Sampler Bank of VirtualDJ.
If a bank has less than 9 samples, both sides of the unit will control the same samples. If a bank has more than 8 samples, the left side of the unit will control samples 1 to 8 and the right side samples 9 to 16.
Hold SHIFT down and then use the same Pads to stop a playing sample (useful if the Unmute or Stutter Trigger mode is selected)
Use the PARAMETER encoder to select the previous/next Sampler Bank
Hold SHIFT down and then use the encoder to cycle through the available Sampler Trigger modes (On/Off, Hold, Stutter and Unmute).
Hold the SAMPLE mode button down and then use the encoder to adjust the Master Volume of the Sampler Output.
Loops
Press the LOOP mode button to set the 8 numbered Pads in Loop mode (selection per side/deck).
The LOOP Pads page will be also selected on the VirtualDJ GUI.
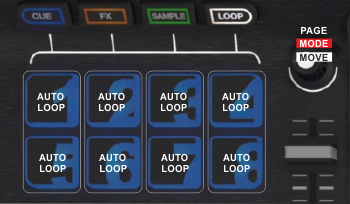
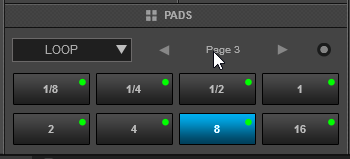
Each one of the 8 numbered Pads triggers a Loop of a different size (from 1/32 to 128 beats) depending on the selected Loop page.
Use the PARAMETER encoder to select a different page with the desired loop sizes.
Hold SHIFT down and then use the encoder to select one of the 3 available Loop modes.
- On/Off : Loops will toggle
- Hold : Loops will be applied momentary (while the Pads are pressed)
- Roll : Loops will be applied momentary (while pressed), and once released, the track will resume to the position it would have been if the Loop was never triggered.
Hold the LOOP mode button down and then use the PARAMETER encoder to move the triggered loop forward/backwards by 1 beat.
Inputs