


X1600
CONTROLS
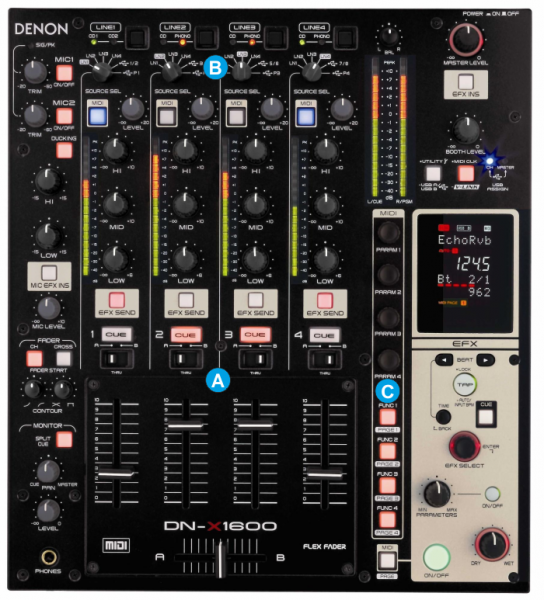
A. MIXER
The Mixer section of the X1600 routes the audio to the Master Output of the unit, depending on the SOURCE SEL position at the top. When in USB or P position, the corresponding mixer channel will control a VirtualDJ mixer channel.
By default, the mixer is assigned with 3-1-2-4 order (Deck 3 - Deck 1 - Deck 2 - Deck 4) The Audio mixing is done by the hardware instead of the internal software mixer, however, but their movements will be shown at the GUI. (fake mixer mode) if the MIDI mode at the top of each channel is enabled.
A different mixer order can be selected via the VirtualDJ Options or from the Mixer Options menu (available in the 4 Decks default skin - above the Crossfader)
B. SOURCE SELECT

When the Source Select switches are set to USB 1/2, 3/4, 5/6 and 7/8, the signal from the USB audio interface will be routed to the Master Output of the unit
When the Source Select switches are set to P1, P2, P3 and P4, the audio signal from the connected Inputs (rear panel), will be routed to the USB Audio Interface instead of the Master Output. This mode is mostly used for Timecode Control (DVS)
C.MIDI
 The MIDI section of the X1600 offers 4 buttons and 4 pushed rotaries which offer different functionality, depending on the selected MIDI PAGE. The 4th Page is unassigned
- MIDI PAGE Hold the MIDI PAGE button down and then press one of the 4 buttons to choose one of the 4 available pages. The functionality of each mode is described below
- FUNC1
Page 1 : Start/Stop Video Transition
Page 2 : Reset Key of Deck 1
Page 3 : Trigger Sampler Slot 1 - FUNC2
Page 1 : Toggle V.TR. Variable/mode
Page 2 : Reset Key of Deck 2
Page 3 : Trigger Sampler Slot 2 - FUNC3
Page 1 : Start/Stop Video Effect
Page 2 : Reset Key of Deck 3
Page 3 : Trigger Sampler Slot 3 - FUNC4
Page 1 : Toggle V.FX Variable/mode
Page 2 : Reset Key of Deck 4
Page 3 : Trigger Sampler Slot 4 - PARAM1
Page 1 : Select Video Transition. Push to enable Random Video Transition mode
Page 2 : Adjust Key of Deck 1. Push to reset
Page 3 : Adjust Sampler Volume Master - PARAM2
Page 1 : Control Video Transition Parameter 1 or 2, depending on the V.TR. variable/mode. Push to open Video Transition GUI
Page 2 : Adjust Key of Deck 2. Push to reset
Page 3 : Select Sampler Bank - PARAM3
Page 1 : Select Video Effect.
Page 2 : Adjust Key of Deck 3. Push to reset
Page 3 : Select Sampler Trigger mode - PARAM4
Page 1 : Control Video Effect Parameter 1 or 2 depending on the V.FX variable/mode. Push to open/close the Video FX GUI
Page 2 : Adjust Key of Deck 4. Push to reset
Page 3 : No function
