Hercules - Inpulse 500
PERFORMANCE PADS

KEY
ACTION
SHIFT ACTION
M1 HOTCUESet Pads to Hotcues mode (led will be turned on solid)Set Pads to KeyCue mode (led will be flashing)M2 ROLLSet Pads to Roll mode (led will be turned on solid)Set Pads to FX mode (led will be flashing)M3 SLICERSet Pads to Slicer mode (led will be turned on solid)Set Pads to Scratch mode (led will be flashing)M4 SAMPLERSet Pads to Sampler mode (led will be turned on solid)Set the 8 Pads to BeatJump mode (led will be flashing)HOTCUE MODE
Press the HOTCUE mode button [M1] to set the Pads to Hotcue mode. The Hotcue Pads page will be also displayed on the GUI of VirtualDJ, reflecting the operation of the 8 Pads. 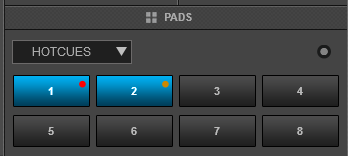
Hotcues Pads Page KEY
ACTION
SHIFT (SECONDARY) ACTION
PADS 1-8Assigns current track's position to Hotcue 1 to 8 or jumps to its position if already setDelete the assigned Hotcue 1 to 8
LOOP MODE
Press the LOOP mode button [M2] to set the Pads to Loop Roll mode. The Loop Roll Pads page will be also displayed on the GUI of VirtualDJ, reflecting the operation of the 8 Pads. 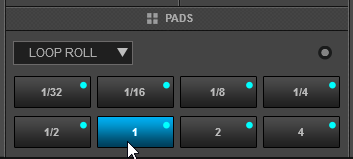
Loop Roll Pads Page KEY
ACTION
SHIFT (SECONDARY) ACTION
PADS 1-8Press and hold a Pad to trigger a Loop Roll of a pre-defined size in beats.. The track will resume playing from the position it would have been if the loop roll was never triggered. Same action
SLICER MODE
Press the SLICER mode button [M3] to set the Pads to Slicer mode. The Slicer Pads page will be also displayed on the GUI of VirtualDJ, reflecting the operation of the 8 Pads. 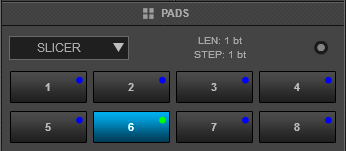
Slicer Pads Page KEY
ACTION
SHIFT (SECONDARY) ACTION
PADS 1-8Each Pad represents a slice of the beat-grid pattern (1 beat or other size defined from the 1st Parameter of the Slicer Pads page). Press and hold a Pad to repeat-loop a part of this slice (depending on the 2nd Parameter value). The track will resume playing from the position it would have been if the slicer pad was never triggered. Same action, with the difference that the slice is memorized.
SAMPLER MODE
Press the SAMPLER mode button [M4] to set the Pads to Sampler mode. The Sampler Pads page will be also displayed on the GUI of VirtualDJ, reflecting the operation of the 8 Pads. 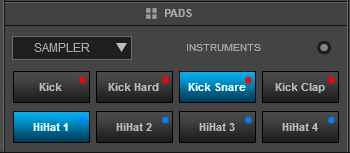
Sampler Pads Page KEY
ACTION
SHIFT (SECONDARY) ACTION
PADS 1-8Press Pad 1 to 8 to trigger a Sample (1 to 8) of the selected Sampler Bank (1st Parameter of Sampler Pads page) The sample will be triggered depending on the selected Trigger Sampler mode (2nd Parameter of the Sampler Pads page) Stop the playing sample. Useful when the Stutter or Un-mute trigger mode is selected*Note: If the selected Sampler Bank has less than 9 samples, both sides of the Pads will trigger the same samples. If the selected Sampler Bank has more than 8 samples, the left side Pads will trigger Samples 1 to 8 and the right side Pads will trigger Samples 9 to 16.
MODE 5 - KEYCUE
Hold SHIFT and then press the HOTCUE mode button [M1] to set the Pads to KeyCue mode. The KeyCue Pads page will be also displayed on the GUI of VirtualDJ, reflecting the operation of the 8 Pads. 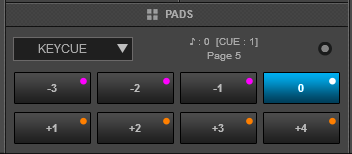
KeyCue Pads Page KEY
ACTION
SHIFT (SECONDARY) ACTION
PADS 1-8Each Pad jumps to the currently selected Hotcue (or temporary CUE if no Hotcue is assigned) and plays and changes its musical key by a semitone value designated from the Pad's text as shown on GUI. Different values can be used by selecting a different page (2nd Parameter of the KeyCue Pads page)Select a Hotcue for the KeyCue pads to apply to.
MODE 6 - FX MODE
Hold
SHIFT down and then press the LOOP mode button [M2] to set the Pads to FX mode (led will be flashing). In this mode, the Inpulse 500 can operate in 2 modes, depending on the
PadFXMode setting (from VirtualDJ Settings->OPTIONS tab).
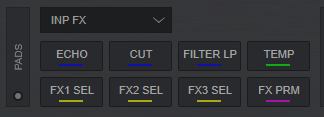
 When set to No (default), the Pads will be assigned to INP FX page, and will offer controls for VirtualDJ Effects. In this mode the Page can be assigned to any of the available VirtualDJ Pad pages.
*Note: This special Pads Page will be available to select, only if the Inpulse 500 is connected.[
Inpulse500 FX Pads Page KEY
ACTION
SHIFT (SECONDARY) ACTION
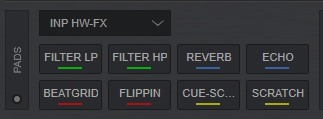
PAD 1Trigger the Effect of FX Slot 1 PAD 2Trigger the Effect of FX Slot 2 PAD 3Trigger the Effect of FX Slot 3 PAD 4When enabled, Pads 1 to 3 will trigger their assigned Effects while Pads are held down (temporary mode)Load the Effects of FX Bank 1 to FX Slots 1 to 3. Hold down for more than 1 second to save the Effects assigned to FX Slots 1 to 3 to FX Bank 1. PAD 5Select the next available Effect for FX Slot 1 PAD 6Select the next available Effect for FX Slot 2 PAD 7Select the next available Effect for FX Slot 3 PAD 8Enable/disable the FX Param mode. When enabled and the INP FX Pads page is selected, use the LOOP Encoder to control the 1st Parameters of all the Effects in Slots 1 to 3 (or with SHIFT down for Parameter 2)Load the Effects of FX Bank 2 to FX Slots 1 to 3. Hold down for more than 1 second to save the Effects assigned to FX Slots 1 to 3 to FX Bank 2. When set to Yes, the Pads will be assigned to INP HW FX page, and will offer mostly hardware operations. In this mode the Page cannot be assigned to any of the available VirtualDJ Pad pages.
The functionality of the Pads in this mode is mostly hard-coded in the Inpulse firmware and most of it cannot be changed. As a result of this hardware functionality, the Pads on the GUI do not offer any functionality if triggered from GUI, they just offer an aid showing the selected FX mode and an idea of what each Hardware pad does.
*Note: This special Pads Page will be available to select, only if the Inpulse 500 is connected.
Inpulse500 HW FX Pads Page KEY
ACTION
SHIFT (SECONDARY) ACTION
PAD 1Press and hold Pad 1 to trigger the Filter LP Effect. The pad also controls the 1st Parameter of the LP Filter effect, starting from the zero value and gradually increasing to the maximum, as long as the pad is pressed. Effect is turned on when the pad is released (momentary) No function is assignedPAD 2Press and hold Pad 2 to trigger the Filter HP Effect. The pad also controls the 1st Parameter of the HP Filter effect, starting from the zero value and gradually increasing to the maximum, as long as the pad is pressed. Effect is turned on when the pad is released (momentary) No function is assignedPAD 3Press Pad 3 to trigger the Reverb * Effect. The pad also assign the 1st Parameter of the Reverb effect to a certain value, and gradually fast-decreases deck's Volume to the minimum. Effect is turned on when the pad is pressed again (toggle)No function is assignedPAD 4Press Pad 4 to trigger the Echo * Effect. The pad also assign the 1st Parameter of the Echo effect to a certain value, and gradually fast-decreases deck's Volume to the minimum. Effect is turned on when the pad is pressed again (toggle)No function is assignedPAD 5Press and hold Pad 5 to trigger the Beat Grid Effect. The Effect is turned off when the pad is released (momentary)No function is assigned PAD 6Press and hold Pad 6 to trigger the Flippin Double Effect. The Effect is turned off when the pad is released (momentary)No function is assigned PAD 7Press and hold Pad 7 to perform a "Baby" Scratch effect at the current position. The Scratch is turned off when the pad is released (momentary)No function is assignedPAD 8Press and hold Pad 8 to jump at the 1st assigned Hotcue and perform a "Baby" Scratch effect from that position. The Scratch is turned off when the pad is released (momentary)No function is assigned Note *:
For best results on the Reverb and Echo Effects, it is advised to enable the Post Fader Effects setting (from VirtualDJ Settings->Options tab->fxProcessing setting to Post-fader). This will allow these Effects to continue trailing for a while, when the Volume fader is moved to the minimum position
MODE 7 - SCRATCH
Hold SHIFT down and then press the SLICER mode button [M3] to set the Pads to Scratch mode. The Scratch Pads page will be also displayed on the GUI of VirtualDJ, reflecting the operation of the 8 Pads.
Scratch Pads Page KEY
ACTION
SHIFT (SECONDARY) ACTION
PADS 1-8Each Pad performs a scratch routine while pressed or quickly releasedOpens the Scratch DNA Editor to edit the scratch routine.
MODE 8 - BEATJUMP
Hold SHIFT down and then press the the SAMPLER mode button [M4] to set the Pads to BeatJump mode. The BeatJump Pads page will be also displayed on the GUI of VirtualDJ, reflecting the operation of the 8 Pads.
BeatJump Pads Page KEY
ACTION
SHIFT (SECONDARY) ACTION
PADS 1-8Each Pad moves the track forward/backwards by the value in beats designated by the Pad's text on GUI. Different beat values can be applied by selecting a different page (1st Parameter of the BeatJump Pads page)Same action Front & Rear


