


X1850
ADVANCED SETUP
RECORDING
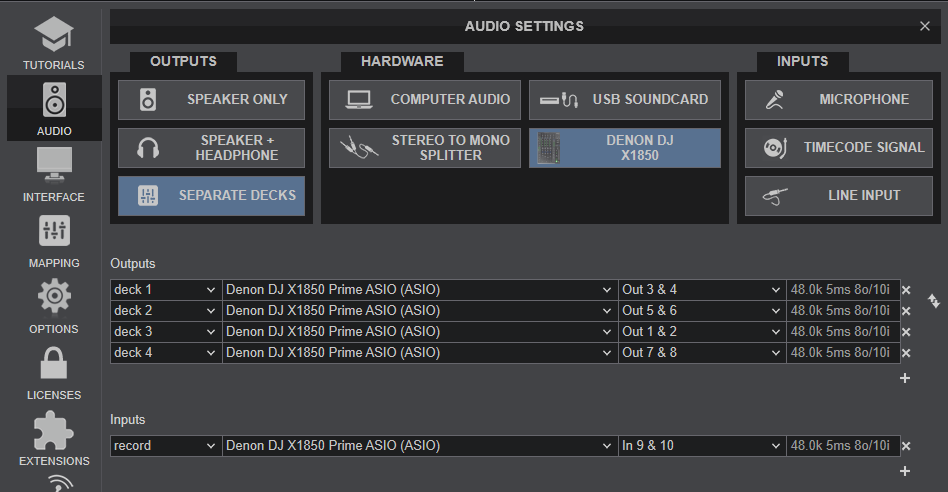
No additional setting is required to record your mix with the Denon DJ X1850, as long as the record input (Channels 9,10) is included in the Audio Setup of VirtualDJ. The X1850 will send its pre-fader Master Output audio signal to VirtualDJ for recording, including all other inputs such as Microphones and Input Channels.
MIXER CHANNEL ORDER
By default VirtualDJ will assign and route its 4 Decks as followed (Mixer Order 3-1-2-4):
VirtualDJ Deck 3 -> Mixer Channel 1 (USB Audio channels 1,2)
VirtualDJ Deck 1 -> Mixer Channel 2 (USB Audio channels 3,4)
VirtualDJ Deck 2 -> Mixer Channel 3 (USB Audio channels 5,6)
VirtualDJ Deck 1 -> Mixer Channel 4 (USB Audio channels 3,4)
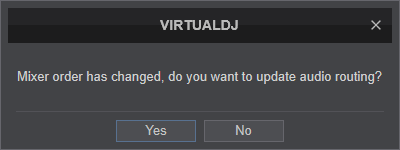
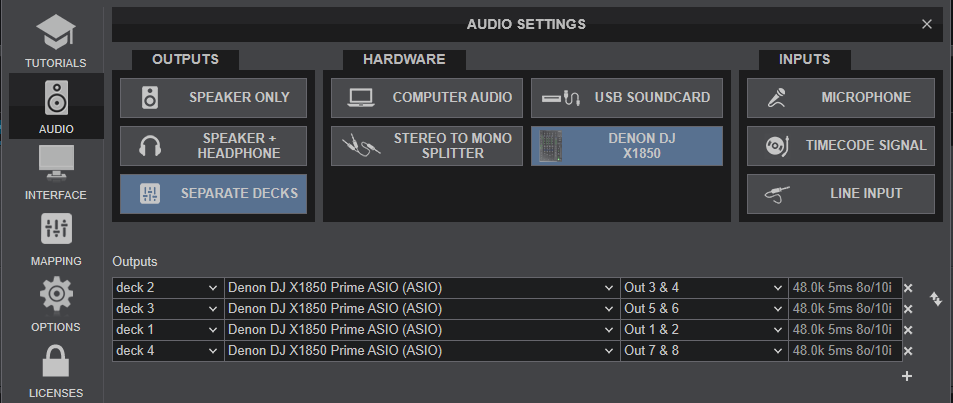
If you prefer to have a different mixer channel order - e.g. 1-2-3-4 to match the channel order of the device's silkscreen - you can change that from VirtualDJ Settings (mixerOrder setting).

Every time the mixer channel order is changed, VirtualDJ will ask you if you want the Audio Setup (USB channels order) to follow the new Deck assignment. Click to Yes so that VirtualDJ to automatically update the Audio Setup for you.
Important Note !
For the above to work as expected, the USB Audio Interface Channels need to have the default assignment. By default the firmware of the Denon DJ X1850 has assigned Channels as followed:
CH1 ASSIGN to 1,2
CH2 ASSIGN to 3,4
CH3 ASSIGN to 5,6
CH4 ASSIGN to 7,8
Press the UTILITY button. Use the FX SELECT encoder to navigate to the ADVANCED AUDIO menu and push the FX SELECT. Navigate to USB AUDIO menu option and push to select. For each CH1 to CH4 ASSIGN, push to change the Output channels. Make sure the CH ASSIGNS are set as above.
Timecode (DVS)
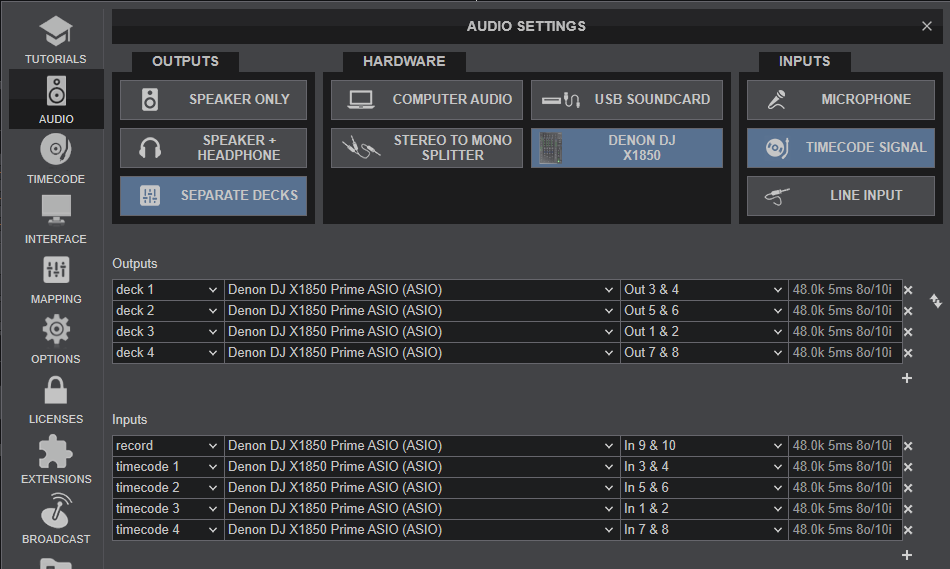
VirtualDJ is offering DVS (Digital Vinyl System) support for the Denon DJ X1850. A Timecode Plus or Pro Infinity license is required. https://virtualdj.com/buy/ Up to 4 Timecode Inputs are available to control any software decks via Timecode CDs or Vinyls.
Connect your Timecode devices at the rear panel of the X1850 to the Inputs CH 1 to 4 and make sure the INPUT SELECT switchers at the top panel are set to DVS position.
Use the Utilities of the X1850 to set the respective USB Channels to LINE or PHONO depending on the connected DVS device.
Hold down UTILITY button->ADVANCED AUDIO->DVS SETUP->CH1 to CH4->Push and change to LINE or PHONO. Default X1850 settings are all CHs to LINE (Timecode CD).
Open the AUDIO tab of VirtualDJ Settings and click on the TIMECODE button. By default VirtualDJ will auto-create 4 Timecode Inputs as per the following image.
Click to APPLY.
Press PLAY on your timecode CD and/or Vinyl device and VirtualDJ will automatically detect your Timecode type and make the appropriate adjustments for best performance.
Open the TIMECODE tab of the VirtualDJ Settings and choose the CALIBRATE button if for any reason the signal is not detected (possibly due to reversed phase connections).
The above Timecode setup will properly assign Timecode inputs if the 3-1-2-4 default Mixer order is selected. If a different mixer order is selected, the Timecode Inputs channels in VirtualDJ Audio setup need to be manually changed.