Djratedxxx919 wrote :
How about being able to Use only the decks you need up to 99?
i don't understand what that means.
Posted Sun 16 Jul 17 @ 3:00 am
djkz wrote :
i don't understand what that means.
Djratedxxx919 wrote :
How about being able to Use only the decks you need up to 99?
i don't understand what that means.
It actually might be too much, but like a drop down menu so you can choose how many decks of the 99 you actually want to use. Then it would only need to be one skin, you 12 skin would be part of this skin. So you have 2 main decks, so lets use left deck for example. Left deck has a menu that allows you state how many actual deck you want to use for the left side, Main left deck plus how many decks you choose...for exmaple lets say 4. So on left side you have 1 main deck and 4 extra decks. So the skin is not filled with decks you're not using. But as I think about it that might be to large a file to be skin.
Posted Sun 16 Jul 17 @ 11:37 am
So you want a menu with 99 choices on it?!
Posted Sun 16 Jul 17 @ 11:56 am
groovindj wrote :
So you want a menu with 99 choices on it?!
Here we go....
It could be done with set of x amount. or just actually type in a number or a plus symbol you press to add decks.
Posted Sun 16 Jul 17 @ 12:08 pm
the total number of decks is not changeable inside the skin. it is a part of the skin.
this is not me. this is a limit of virtual dj.
the only way around that is to create 12 different skins each with a different limit. and that may be something to consider in a future update.
this is not me. this is a limit of virtual dj.
the only way around that is to create 12 different skins each with a different limit. and that may be something to consider in a future update.
Posted Sun 16 Jul 17 @ 1:15 pm
Hi . It looks really cool, but do you have a practical video to learn where and how to use the basics of the 99 buttons. I would love to have remix phrases as mention on a previous post, but maybe not 99. Thanks
Posted Tue 18 Jul 17 @ 11:38 pm
let's do a written tutorial first. if this doesn't clarify how things work, i'll do a video.
=============
first we have the Remix decks panels: D1-D12.
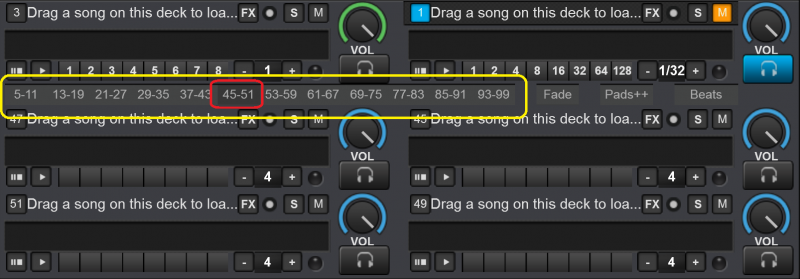
the yellow rectangle highlights where all the buttons to switch decks are located.
there are 12 remix decks panels that you can choose from.
for scripting purposes they have been named D1, D2, D3, D4, all the way to D12. ; D13: Fade ; D14: Pads++ ; D15: Beats
the red rectangle shows remix decks 45-51 are highlighted. that means that remix decks 47, 45, 51, 49 are shown.
click on any other remix deck panel: D1 - D12 to show any other remix deck panels.
LEFT side and RIGHT side
on the left side of the skin the remix decks are ODD numbered. on the right side of the skin the remix decks are EVEN numbered. similar to the decks 3,1, 2,4 protocol we are all used to with hardware controllers.
WARNING
it may be too heavy a task for some computers to use up all 99 decks.
=============
next we have Fade panel: D13
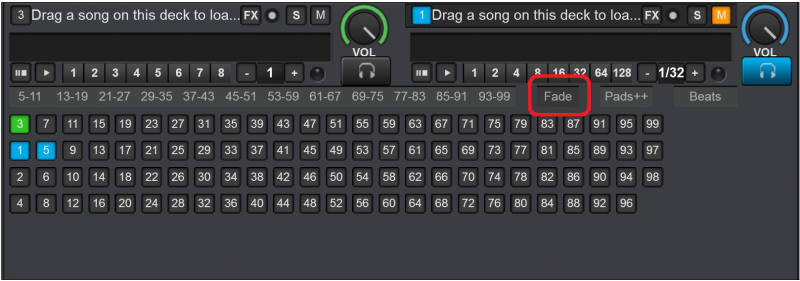
this panel allows you to select which decks will be left side assignable for use with mixer fader.
for visual aid only, first row: 3,7,11 etc. are green. 2nd row: 1,5,9, etc. are blue. 3rd row: 2,6,10. are red. and 4th row: 4,8,12 etc. are orange.
LEFT side and RIGHT side
the Fade panel on the left side of the skin will set the selected decks to fade left.
to set decks to fade right. click on the Fade panel on the left side of the skin. M13
WARNING
Do not confuse color with side. left side of the skin is left assignment and right side of the skin is right side assignment.
=============
next we have Pads++ panel: D14
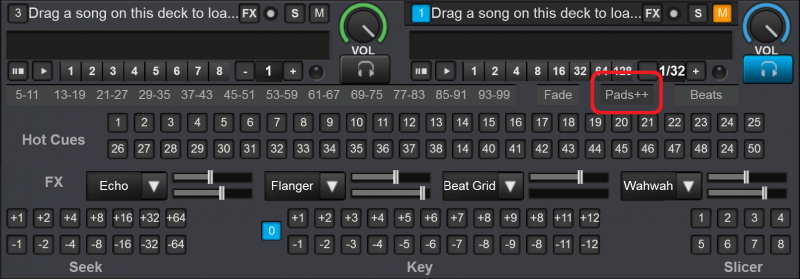
this panel is easy enough to understand due to labels
you have the Hot Cues buttons next to "Hot Cues". row1: hotcues1 -25 and row 2: hotcues 26-50.
beneath that you have the "FX." 4 effects with 2 sliders each.
then 3 items Seek, Key, and Slicer
Seek: jump by beats forward(+) and backwards(-),
Key: change the pitch of the song without affecting the speed. 0=no change
Slider: slices up 8 beats that you can click to loop until release. you can set the values of the slicer in the main deck Slicer pads options
=============
last we have Beats panel: D15
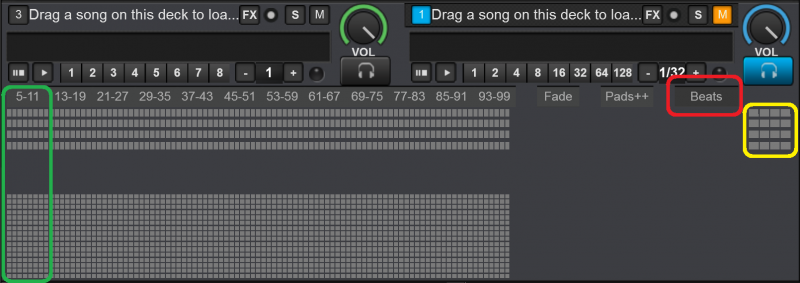
red rectangle shows the button to show the Beats panel.
yellow shows the beats for decks 3,1,2,4. also at the top of the skin.
there are 99 decks all together. panel button: D1 (5-11) shows the beats for decks 5-12.
odd decks are colored in blue. Left side of the skin
even decks are colored in red. Right side of the skin
if you see a block in blue, it means that there is a song loaded in that panel. so click on the decks panel above it to see the deck.
if you see a block color moving, it means that there is a song being played in that panel.
when a master deck is selected, you will see thing white lines moving down the entire 99 decks. this is designed to help you align the beats of the songs.
=============
first we have the Remix decks panels: D1-D12.

the yellow rectangle highlights where all the buttons to switch decks are located.
there are 12 remix decks panels that you can choose from.
for scripting purposes they have been named D1, D2, D3, D4, all the way to D12. ; D13: Fade ; D14: Pads++ ; D15: Beats
the red rectangle shows remix decks 45-51 are highlighted. that means that remix decks 47, 45, 51, 49 are shown.
click on any other remix deck panel: D1 - D12 to show any other remix deck panels.
LEFT side and RIGHT side
on the left side of the skin the remix decks are ODD numbered. on the right side of the skin the remix decks are EVEN numbered. similar to the decks 3,1, 2,4 protocol we are all used to with hardware controllers.
WARNING
it may be too heavy a task for some computers to use up all 99 decks.
=============
next we have Fade panel: D13

this panel allows you to select which decks will be left side assignable for use with mixer fader.
for visual aid only, first row: 3,7,11 etc. are green. 2nd row: 1,5,9, etc. are blue. 3rd row: 2,6,10. are red. and 4th row: 4,8,12 etc. are orange.
LEFT side and RIGHT side
the Fade panel on the left side of the skin will set the selected decks to fade left.
to set decks to fade right. click on the Fade panel on the left side of the skin. M13
WARNING
Do not confuse color with side. left side of the skin is left assignment and right side of the skin is right side assignment.
=============
next we have Pads++ panel: D14

this panel is easy enough to understand due to labels
you have the Hot Cues buttons next to "Hot Cues". row1: hotcues1 -25 and row 2: hotcues 26-50.
beneath that you have the "FX." 4 effects with 2 sliders each.
then 3 items Seek, Key, and Slicer
Seek: jump by beats forward(+) and backwards(-),
Key: change the pitch of the song without affecting the speed. 0=no change
Slider: slices up 8 beats that you can click to loop until release. you can set the values of the slicer in the main deck Slicer pads options
=============
last we have Beats panel: D15

red rectangle shows the button to show the Beats panel.
yellow shows the beats for decks 3,1,2,4. also at the top of the skin.
there are 99 decks all together. panel button: D1 (5-11) shows the beats for decks 5-12.
odd decks are colored in blue. Left side of the skin
even decks are colored in red. Right side of the skin
if you see a block in blue, it means that there is a song loaded in that panel. so click on the decks panel above it to see the deck.
if you see a block color moving, it means that there is a song being played in that panel.
when a master deck is selected, you will see thing white lines moving down the entire 99 decks. this is designed to help you align the beats of the songs.
Posted Wed 19 Jul 17 @ 2:35 am
almost forgot.
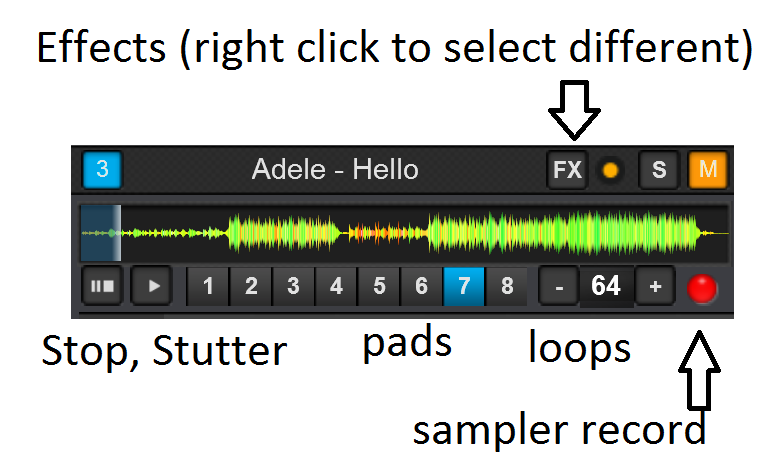
the remix deck.
this small powerful deck could definitely use a video tutorial.
how to remix
1. drag a song on to the deck.
2. use the 'LOOPS' to set and activate a loop where you want the song to loop.
3. click on the play button to play the loop.
==============
Note:
if you like the loop, you can click on the record button to record the loop.
make sure that orange circle is on so the beats are synced up with the master deck.
if its synced up, then the 's' will be highlighted.
the pads buttons and the 'FX' button give you more power to remix.
FX will enable/disable effect 1. to select a different effect, right click on FX
to change pads
1. click on the deck number. in this example the deck number is 3. that will assign deck 3 to the left side deck.
2. now that you have full control over that deck, you can set the pads to do whatever you want. custom buttons, slicer, hot cues, loops, etc.
note: setting the pads to "slicer" will give you a visual aid as to the beats the song is in. which makes it easier to use the deck as a remix.
Master Deck
to set the deck to be the one that all other decks sync to. click on the 'M'. when the deck is the master deck, the M button will be highlighted. as in this example sample case.
all 99 decks are identical. master one, and you will master all 99.
Posted Wed 19 Jul 17 @ 2:48 am


