


SCS.1m
CONTROLS
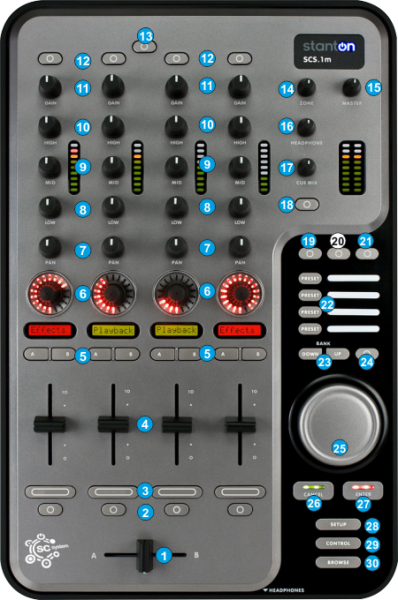
- CROSSFADER. Blends audio between the channels assigned to the left and right side of the crossfader.
- SELECT. Choose which of the 4 available decks will be the selected one. Only one deck can be selected each time.
- PFL. Press these buttons to send any channel's pre-fader signal to the Cue Channel for monitoring. When engaged, the button will be lit.
- VOLUME. Adjust the Volume of each mixer channel/deck. .
- A-B. Crossfader Assign buttons. Routes the audio playing on the corresponding channel to either side of the crossfader (A for left or B for right), or bypasses the crossfader and sends the audio directly to the Program Mix. The crossfader assign indicators are available in the 4 decks default GUI of VirtualDJ.
- FX ENC. Use this encoder to select an Effect for each deck. The LCD below will display the name of the selected Effect.
Push the encoder to enable/disable the selected effect. If the effect is activated, use the encoder to adjust the 1st parameter of the Effect. The LCD below will display the short name of this parameter and its value if used. . - FILTER. Applies a Low/High Pass Filter on the software decks.
- EQ LOW. Adjusts the low (bass) frequencies of the Equalizer.
- EQ MID. Adjusts the middle (mid) frequencies of the Equalizer.
- EQ HIGH. Adjusts the high (treble) frequencies of the Equalizer
- GAIN. Adjusts the audio level (gain) of the corresponding channel
- GAIN ZERO. Press this button to ensure that the track will be output at 0db level.
- PANEL SEL. Use this button to cycle through the available center panels of the default GUIs of VirtualDJ.
- ZONE. Adjusts the Booth Output Volume
- MASTER: Adjusts the Master Output Volume
- HEADPHONES VOLUME. Adjusts the volume level of the headphone output.
- HEADPHONES MIX: Turn to mix between Cue and Program in the Headphone channel. When all the way to the left, only channels routed to Cue will be heard. When all the way to the right, only the Program mix will be heard.
- HEADPHONES SPLIT. When this button is turned on, the headphone audio will be "split" such that all channels sent to Cue are mixed to mono and applied to the left headphone channel and the Program mix is mixed to mono and applied to the right channel. When the button is turned off (default status), Cue and Program audio will be "blended" together.
- BUT 0.(left) Use this button to select the next available Video Transition.
- BUT 0.(center) Use this button to select the next available Master Video Effect.
- BUT 0. (right) Use this button to enable/disable the selected Master Video Effect.
- PRESET (1-4). The 4 Preset buttons are assigned to control the first 4 Custom Buttons of the default VirtualDJ GUI. Use the custom Button editor to assign any custom action using VirtualDJ script actions.
- BANK (DOWN/UP). Use these buttons to set the focus to the previous (DOWN) or next (UP) Browser Window (Folders List, Songs List and Sideview if opened)
- BANK 0. Press and hold this button for more than 1 second to show/hide the Sideview. Push the button to cycle through the available views of Sideview (Automix, Sidelist, Karaoke, Sampler and Clone)
- ROTARY. The rotary offers different functions depending on the selected mode (defined by the CONTROL and BROWSE buttons)
In Browser mode (default), use the rotary to scroll through files or folders. If the focus is on the Folders List, push the rotary to expand/collapse the subfolders. If focus is on any different window, push the rotary to load the selected track to the selected deck.
In Prelisten mode (BROWSE button will blink), use the rotary to scroll though files. Push the rotary to enter the Prelisten mode and use the same rotary to seek through the pre-listened track.
In Control mode (CONTROL button will be on), use the rotary to seek through the loaded track on the selected deck. - CANCEL. This button offers different functions depending on the selected mode (defined by the CONTROL and BROWSE buttons)
In Browser mode (default), use this button to unload the selected deck. The led of this button will be on (red) if the deck is already loaded.
In Prelisten mode (BROWSE button will blink), use this button to stop the Prelisten Player (at the beginning of the track)
In Control mode (CONTROL button will be on), use this button to set a temporary Cue point or return to the previously used cue point if playing. (CUE) - ENTER. This button offers different functions depending on the selected mode (defined by the CONTROL and BROWSE buttons)
In Browser mode (default), use this button to load the focused track on the selected deck. The led of this button will be on (green) if the deck is empty.
In Prelisten mode (BROWSE button will blink), use this button to start or pause the Prelisten Player. The Prelisten Player will load the focused track from the Browser and will continue to play whatever track is focused (using the rotary).
In Control mode (CONTROL button will be on), use this button to play-pause the selected deck - SETUP. Use this button to open the CONFIG (settings) window of VirtualDJ.
- CONTROL. Press this button to set the Rotary and the CANCEL/ENTER buttons to Control mode. If the Control mode is selected, the led of this button will be lit.
- BROWSE. Press this button to set the Rotary and the CANCEL/ENTER buttons to Browser mode. If the Control mode is selected, the led of this button will be lit
If the Browser mode is selected, press this button again to set the Rotary and the CANCEL/ENTER buttons to Prelisten mode. If the Prelisten mode is selected, the led of this button will blink.
Advanced Setup