


SCS.1d
CONTROLS
A See Hotcues & Loops section
B See Effects & Browser section
C See Sampler section
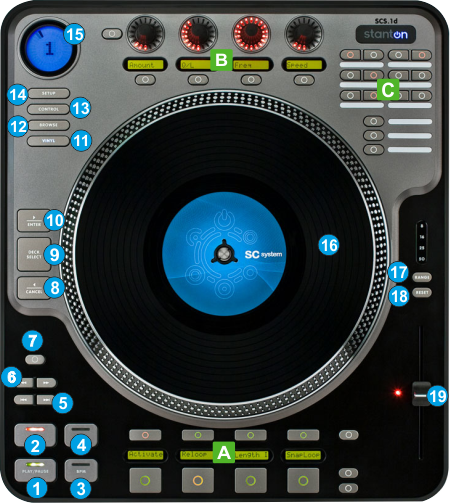
- PLAY. Plays / Pauses the track.
- CUE. When the Deck is paused, you can set a Cue Point by moving the Platter to place the Audio Pointer at the desired location and then pressing the Cue Button.
During playback, you can press the Cue Button to return the track to this Cue Point. (If you did not set a Cue Point, then it will return to the beginning of the track.).
If the Deck is paused, you can press and hold the Cue Button to play the track from the Temporary Cue Point. Releasing the Cue Button will return the track to the temporary Cue Point and pause it. To continue playback without returning to the Temporary Cue Point, press and hold the Cue Button, then press and hold the Play Button, and then release both buttons. - BPM. Use this button to manually tap the tempo of the track (in case the BPM is inaccurate). Tap at least 4 times in order VirtualDJ to auto-calculate the tempo of the track. While track is paused, tap once to set the current position as the 1 beat of the 4beat Beatgrid.
- SYNC. Press this button to automatically match the corresponding Deck's tempo with the opposite Deck's (or the Master Deck’s if using a 4 decks Skin) tempo and phase.
- FAST SEARCH. Use these buttons to move the loaded track forward/backwards by 4 beats (fast seek).
- SEARCH. Use these buttons to move the loaded track forward/backwards by 1 beats (seek).
- KEYLOCK. Press this button to "lock" the track's pitch to its original key. The track's tempo will remain at the speed designated by the Pitch Fader.
- CANCEL. Press this button to unload the track from the selected deck.
- DECK SELECT. Use this button to cycle and select the next available deck as selected. The number of the available decks depends on the number of the connected midi devices, the decks that each one can control and the decks of the loaded skin (VirtualDJ will choose the largest number)
- ENTER. Load the selected track from the Browser to the selected deck.
- VINYL. Press this button to set the Jogwheel to Vinyl (Scratch) mode or CD (Bend) mode. In Vinyl mode, use the outer part of the Jogwheel to bend (temporary speed up – slow down the tempo of the track) and the inner touch-sensitive part to scratch. In CD mode (Vinyl mode off), the motor will not operate and the jogwheel can only be used to pitch bend.
- BROWSE. Press this button to set the upper FX encoders (A) to Browser mode. See Effects & Browser.
- CONTROL. Press this button to set the upper FX encoders (A) to FX mode (default mode). See Effects & Browser
- SETUP. If the 2 decks default skin of VirtualDJ 8 is used, press this button to cycle through the available side panels for the selected deck (HotCues, Loops and Effects)
- DECK LCD. The LCD display will show the selected/controlled deck of the unit and a pointer to show the position of the track. The same circle pointer will blink if the track reaches the end.
- JOG. Motorized platter.
- RANGE. Press this button to select the next available range for the Pitch Fader (available values ±8%, ±16%, ±25% and ±50%).
The Leds above this button will indicate the selected pitch range. - RESET. Press this button to smoothly reset the pitch to its zero position. The Led of this button will blink while pitch is resetting,
- PITCH. Adjust the track's playback speed (tempo). The motorized pitch fader will follow the value of the software pitch and vice versa. The red led right next to the pitch fader will be on if the pitch is at the zero position.
Hotcues & Loops