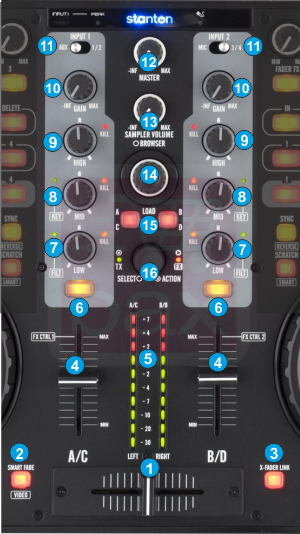
CROSSFADER. Blends audio between the channels assigned to the left and right side of the crossfader. The channel can be assigned using the Crossfader channel assign button from the default 4 Decks skin of VirtualDJ. Hold SHIFT down and then use this fader to control the Video Crossfader of VirtualDJ.
SMART FADE. Press this button to enable/disable the Auto Video Crossfader mode. When enabled, the video transition between left and right assigned decks will be handled automatically by VirtualDJ and the selected Video Transition.
X-FADER LINK. Press this button to enable/disable the Link Video Crossfader mode. When enabled, the Audio Crossfader will also move Video Crossfader of VirtualDJ.
VOLUME. Adjust the Output volume of the left and right selected deck. Note that the Volume of the decks will be controlled regardless of the INPUT switcher (11) position.
CH/MASTER VU. By default the VU meters will show the Output Volume of the Master Output, and will show the Output Level of the corresponding deck if this is selected by the PFL/CUE buttons (6).
CUE/PFL. Press these buttons to send this channel's pre-fader signal to the Cue Channel for monitoring. When engaged, the button will be lit. Hold SHIFT down and then press any of the CUE/PFL buttons to toggle between the 2 different VU meters display modes as described above.
EQ LOW. Adjusts low (bass) frequencies of the corresponding channel in the software or hardware Input. Push the knob to completely cut the Low frequencies (Kill). The red led will indicate the Kill status. Hold SHIFT down and then use this knob to adjust the Low/High Pass Filter for this deck. Hold SHIFT down and then push the knob to reset Filter to its zero (off) position (green led will be off)
EQ MID. Adjusts mid (middle) frequencies of the corresponding channel in the software or hardware Input. Push the knob to completely cut the Mid frequencies (Kill). The red led will indicate the Kill status. Hold SHIFT down and then use this knob to adjust the key of the loaded track for this deck. Hold SHIFT down and then push the knob to reset Key to its original value (green led will be off)
EQ HIGH Adjusts high (treble) frequencies of the corresponding channel in the software or hardware Input. Push the knob to completely cut the High frequencies (Kill). The red led will indicate the Kill status.
GAIN. Adjusts the audio level (gain) of the corresponding channel in the software or hardware Input.
INPUT SOURCE SELECTOR. Use these switchers to determine which one of the 4 available Inputs (AUX, 2xLINEIN and Microphone) will be routed to the 2 stereo input channels of the Stanton DJC.4 built-in interface.
MASTER LEVEL: Adjusts the Master Output Volume (Hardware operation. Movement will not be visible on the VirtualDJ GUI, nor will control the internal mixer Master Volume)
SAMPLER VOLUME: Adjusts the Master Output Volume of the VirtualDJ Sampler
BROWSE KNOB. Scrolls through Folders or Files. Hold SHIFT down and then use this encoder to cycle through the available Sideview windows (Automix, Sidelist, Karaoke, Sampler and Clone/Shortcuts)
BROWSE PUSH. Push the encoder to toggle focus between the Folders and the Songs List. Push and hold the encoder for more than 1 second to show/hide the Sideview Browser window. If focus is on the Folders List, hold SHIFT down and then push the encoder to expand/collapse Subfolders. If focus is on the Songs List, hold SHIFT down and then push the encoder to load the selected track from the Songs List to the Automix List.
LOAD. Press these buttons to load the selected track from the Browser to the left or right selected deck Hold the same buttons down for more than 1 second, to unload the same deck Hold SHIFT down and then use these buttons to set focus to the previous/next Browser window.
TX/FX. Use this encoder to select the Video Transition. Push the encoder to trigger the selected Video Transition. While Transition is triggered use the encoder to adjust its 1st parameter. The TX led will be lit while the video transition is activated.
Hold SHIFT down and then use this encoder to select the Master Video Effect. Push the encoder to enable/disable the selected Master Video Effect. While the Master Video Effect is enabled use the encoder to adjust its 1st parameter. The FX led will be lit if the selected Master Video Effect is enabled.