


Scratch
FRONT & REAR PANELS
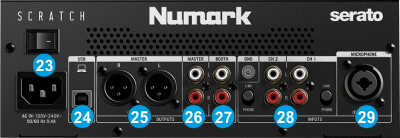
- POWER.ON/OFF. Connect a universal AC cord to the AC socket and power on the unit after all the necessary connections are done.
- USB Use a USB cable to connect the Numark Scratch with a USB port of your computer and allow the unit to send and receive audio and Midi signals
- MASTER OUT (BALANCED) Connect your amplifier using a pair of balanced XLR jacks. The level of this output is controlled by the MASTER VOL knob at the top panel
- MASTER OUT (UNBALANCED). Connect your amplifier using a pair of RCA cables. The level of this output is controlled by the MASTER LEVEL knob at the top panel
- BOOTH OUT Use a pair of RCA cables to connect the unit with your secondary output (e.g. for monitor). The level of this output is controlled by the BOOTH knob at the top panel
- CH INPUTS. 2 x Phono/LINE inputs are provided by RCA jacks (one for each Deck/mixer channel). Set the switcher to PHONO to connect turntables. or LINE to connect other media such as CD Players.
- MIC Input. Use this Input to connect a Microphone. This input is not part of the USB Audio Interface, therefore no microphone input can be added to VirtualDJ Audio setup. Its signal will be routed directly to the Master Output and its volume can be controlled from the top panel.
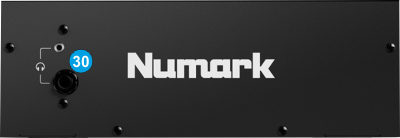
- PHONES INPUT Connect a pair of Headphones for monitoring using this socket using a ¼” or 1/8" adapter/cable.
Inputs & Recording