


MDJ-1000
CONTROLS
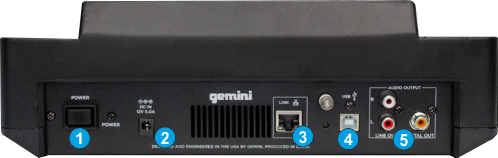
- POWER ON/OFF Power on the unit when all audio connections are made.
- POWER. Connect the supplied AC/CD Adaptor.
- LINK. Ethernet connection for LINK functionality of library sharing between up to 4 players
- USB. This USB connection sends and receives audio and control information from a connected computer.
- LINE OUT: Use standard RCA cables to connect this output to an Input Channel of an Audio mixer.

- S SHIFT. Hold this button down to access secondary functions of the MDJ-1000 (mainly in gray boxes)
M MODE. Use these buttons to select the Input Source. Press the MIDI MODE button to allow the unit to control VirtualDJ software or any other MIDI application.
Note that the sound output of VirtualDJ will be muted when switched from MIDI to any other Source.
- PLAY. Plays / Pauses the track.
- CUE. When the Deck is paused, you can set a Cue Point by moving the Platter to place the Audio Pointer at the desired location and then pressing the Cue Button.
During playback, you can press the Cue Button to return the track to this Cue Point. (If you did not set a Cue Point, then it will return to the beginning of the track.).
If the Deck is paused, you can press and hold the Cue Button to play the track from the Temporary Cue Point. Releasing the Cue Button will return the track to the temporary Cue Point and pause it. - JOG. 8” touch-sensitive high-resolution jog wheel with LCD display for scratching or bending (depending on the VINYL mode selection). The Jogwheel also offers Loop In and Loop Out point adjustment (see Loop Controls)
- JOG ADJUST. Adjust the resistance feeling of the jogwheel
- SEARCH. Hold these buttons down to fast seek forward/backward through the track.
Hold SHIFT down and then use the left button to automatically match the corresponding Deck's tempo with the opposite Deck's tempo and phase (SYNC).
Hold SHIFT down and then use the right button to manually set this deck as MASTER deck (useful mainly in multi-decks operation. All other decks will sync to the MASTER deck) - TRACK SEARCH. Use the right TRACK SEARCH button to load the next track from the Browser to this deck. Use the left button to stop the loaded track to its beginning or load the previous track from the Browser to this deck, if the track is already at its beginning.
- REVERSE. Use this button to play the track in reverse. Once disabled, the track will continue to play at the normal direction from the current position. If Slip mode is enabled, the track will return to the position it would have been if the reverse was never used.
- HOTCUES. Each one of the 4 numbered buttons assigns a Hot Cue Point (1 to 4) or returns the track to that Hot Cue Point.
When a Hot Cue Button is unlit, you can assign a Hot Cue Point by pressing it at the desired point in your track. Once it is assigned, the Hot Cue Button will light. To return to that Hot Cue Point, simply press it.
Hold SHIFT down and then press a button to delete its assigned HotCue. - LOOP IN. Use this button to set a Loop In (Entry) point of a manual loop.
If a Loop is enabled press this button to set the Jogwheel to Loop In mode and then use the jogwheel to fine adjust the Entry point of the triggered Loop. The Led will blink to indicate the selected mode. Press again to return the Jogwheel to Jog mode.
Hold SHIFT down and then use this button to half the size of the triggered loop in beats. - LOOP OUT. Use this button to set a Loop Out (Exit) point of a manual loop.
If a Loop is enabled press this button to set the Jogwheel to Loop Out mode and then use the jogwheel to fine adjust the Exit point of the triggered Loop. The Led will blink to indicate the selected mode. Press again to return the Jogwheel to Jog mode.
Hold SHIFT down and then use this button to double the size of the triggered loop in beats. - RELOOP/EXIT. Use this button to exit a Loop or enable (and jump to the position) the last triggered one (Reloop)
Hold SHIFT down and then use this button to enable the Loop Roll mode. When Loop Roll mode is enabled, Loops will apply momentary (while buttons are pressed) and the track will resume to the position it would have been if the Loop was never triggered, once a Loop button is released. - LOOPS. Each one of the 4 AUTO LOOP buttons triggers a Loop of a different size in beats (2, 4, 8 and 16 beats) as per the silkscreen of the unit.
Hold SHIFT down and then use these buttons to trigger smaller size Loops (1/8, ¼, ½ and 1 beats).
If the Loop Roll mode is enabled, use the same buttons to trigger a momentary Loop Roll (while pressed) of the same size in beats as above. When the button is released the track will resume from the position it would have been if the Loop was never triggered. - FILTER. Use this knob to apply a High/Low Pass Filter on the controlled deck.
- SLIP. Use this button to enable/disable Slip mode. When Slip mode is active, several operations (such as Scratching, HotCues, Loop, pause etc.) will be applied temporary and the track will resume to the position it would have been if the operation was never triggered.
- START/STOP TIME. Adjust the time that the track will need to start or stop. If set to the minimum position, the track will start/stop instantly.
- SCRATCH. Press this button to set the Jogwheel to Vinyl (Scratch) or CD (Bend) mode. In Vinyl mode, use the outer part of the Jogwheel to bend (temporary speed up – slow down the tempo of the track).
- KEYLOCK. Press this button to "lock" the track's pitch to its original key. The track's tempo will remain at the speed designated by the Pitch Fader
Hold SHIFT down and then use this button to cycle the 4 Autocue modes (determines on which position the track will be loaded) - BPM TAP/LOCK. Tap this button (for at least 4 times) based on the rhythm of the track to manually adjust the tempo of the track (if incorrectly calculated by the software). When track is paused, tap this button once to move the Beatgrid anchor to the current position.
Hold SHIFT down and then use this button to lock the software Pitch faders of all the available decks so that they move all together if any of them is moved. - PITCH BEND. Press and hold down these buttons to temporary speed up/slow down the song while pressed. When released, the track playback will return to the speed designated by the Pitch Fader.
Hold SHIFT down and then use the left button to select the next available range for the Pitch. The selected pitch range value is displayed on the LCD screen. - PITCH. Adjust the track's playback speed (tempo). The pitch value in % and the current tempo value (BPM) are displayed on the LCD screen
Note. The actual pitch fader will not alter the pitch of the track if the actual pitch and the software pitch value do not match (software soft-takeover, ghost fader visible on the GUI). In most cases this may happen if SYNC is prior pressed. - BROWSE/SELECT. Use this encoder to scroll through files or folders (depending on the focused Browser window)
If focus is on the Songs list, push the encoder to load the selected track from the Browser to the deck. If focus is on the Folders list, push the encoder to set focus to the Songs list.
Hold SHIFT down and then push the encoder to view all the Loaded Track’s Info and Album Art. - BACK. Press this button to set focus to Folders list. If focus is on the folders list, use this button to expand/collapse subfolders.
- EJECT. Use this button to assign this unit to a different VirtualDJ deck. If only 1 MDJ-1000 unit is connected, the button will cycle though all the available decks (depending on the used VirtualDJ skin). If 2 MDJ-1000 are connected, the left unit may cycle through the left decks (1 and 3) and the right unit though the Right decks (2 and 4).
Both the assigned deck number and the total number of the available software decks are visible on the LCS screen of the MDJ-1000