RELOOP MIXTOUR PRO
SETUP
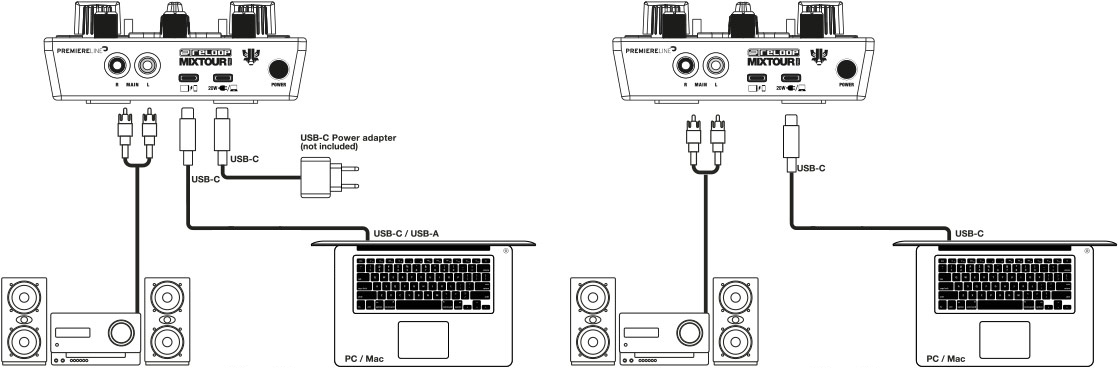
Step 1. Connections
Connect the MIXTOUR PRO with your computer using the provided USB C cable. Connect your Headphones to the front socket of the MIXTOUR PRO and your amplifier/amplified speakers to the Master Out socket at the rear side using an RCA cable.
A USB C Power adaptor is optional.
Step 2. Drivers
Windows : Install the Reloop ASIO* drivers from https://www.reloop.com/reloop-mixtour-pro
Mac OSX : No drivers installation is required
*The Reloop ASIO Drivers are optional. VirtualDJ will use the native Windows WASAPI drivers if not installed, without any operational issue.
Step 3. VirtualDJ
Start VirtualDJ and login with your Account credentials. A Pro Infinity, Pro Subscription or Plus Controller License is required.
Detection Window
Click to “Use Soundcard”. VirtualDJ will automatically create the necessary audio configuration.
Click to OK
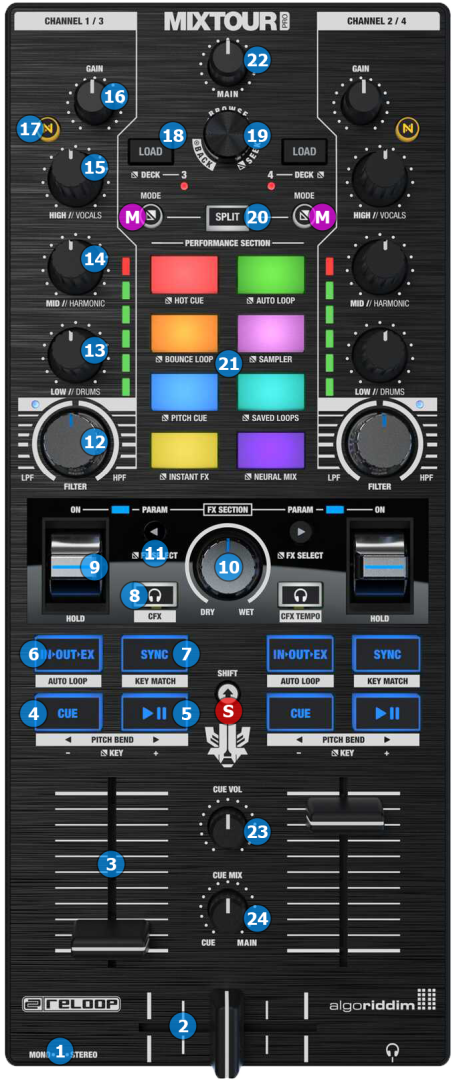
CONTROLS
KEY
ACTION
SHIFT (SECONDARY) ACTION
MODE (THIRD) ACTION
If you release the button without pressing any other button to engage a shortcut, then the pad section of the unit will switch to the side you pressed the MODE button on.
Both LEDs off: No MixFx
Left LED on : Filter
Right LED on : Loop Roll
Both LEDs on : Echo Out
When in "Frequency" mode, the button's led will be off, and the three knobs will control low, middle and high frequencies in a traditional 3 band equalizer manner.
When in "Stems" mode, the button's led will be on, and the three knobs will control stem channels, depending on the selected EQ Mode.
You can change the desired EQ Mode from VirtualDJ GUI.
If the focus is on folders, switches the focus back on songs.
Double click clones the tracks from the other deck.
Push: Switches focus on folders, and opens/closes subfolders. If held down briefly, switches focus back to songs.
Push: Switches focus between sideview and songs.
The pre-defined modes are Hotcues, Loop Roll, Keycue, PADFX, Loop, Sampler, BeatJump and Stems.
The pre-defined modes/pages can be changed to your needs. Please see How to assign Pad modes
Hardware operation, but visible in VirtualDJ GUI
Hardware operation, but visible in VirtualDJ GUI
Hardware operation, but visible in VirtualDJ GUI
